 |
Version 9.0.0
|

|
|
Version 9.0.0
|
|
Before installation, a basic test should be performed in order to verify that the PI imager series can be run on the desired system. For some devices passing the nodrop option to the UVC kernel module is mandatory. The need for this can be checked with a standard application like guvcview. If the camera's raw data (a green noisy image) cannot be displayed at a high framerate the nodrop option needs to be activated. On some devices the nodrop option can lead to incomplete frame transmissions. Therefore it should only be activated if it is really needed.
The nodrop option can be passed at system startup by creating the following file:
$ sudo bash -c 'echo "options uvcvideo nodrop=1" > /etc/modprobe.d/uvcvideo.conf'
This makes the option permanent for the UVC driver (after the next reboot).
Temporary activation can be achieved with:
$ sudo rmmod uvcvideo; sudo modprobe uvcvideo nodrop=1
Alternatively, the parameter can be modified via sysfs during runtime:
$ sudo bash -c 'echo -n 1 > /sys/module/uvcvideo/parameters/nodrop'
Accessing video devices may need the user to be in the system's video group. Checking membership can be done with:
$ groups
Add the current user to this group, if video is not listed there:
$ sudo usermod -a -G video <username>
A new login is necessary afterwards.
The driver is dependant of the following packages:
$ sudo apt-get install cmake freeglut3-dev libusb-1.0-0-dev
Do the basic installation as follows:
Download the latest version of the libirimager: DOWNLOAD LINK
Type in the terminal the following: "sudo dpkg -i /home/User/TheFolderItIsSavedIn/libirimager-<VERSION>-<ARCH>.deb" to install the debian package.
Before using the camera, mandatory calibration files need to be installed. Please connect your camera via the USB cable and ensure access to the internet. Then call the following service application:
$ sudo ir_download_calibration
Everything is installed to /usr/share/libirimager/cali .
If you like to specify a user-defined directory for the calibration files, append the following option:
$ ir_download_calibration -t /tmp
The driver makes use of this calibration directory, if it is specified in the xml configuration file (see Generating configuration files).
The serial number of an attached device can be determined programmatically. Call the following service application to obtain the serial number:
$ ir_find_serial
You might want to search for a specific device, if more than one camera is connected:
$ ir_find_serial -d<Your camera's serial>
For an attached device, an xml configuration file can be generated with the command:
$ ir_generate_configuration > <user-defined file>
You might consider to combine the service application calls to concatenate a generic command, e.g.,
$ ir_generate_configuration > `ir_find_serial`.xml
The generated file contains several parameters that can be adjusted regarding the application's requirements:
<formatspath>/opt/piimager</formatspath> <– The Folder contains the Formats.def file (raw camera formats)
<imager xmlns:xsi="http://www.w3.org/2001/XMLSchema-instance" xmlns:xsd="http://www.w3.org/2001/XMLSchema">
<serial>YOURSERIAL</serial> <– Provide serial number, if you attach more than one camera
<videoformatindex>0</videoformatindex> <– Index of the used video format(USB enpoint) – Link to the Video Formats
<calipath>/usr/share/libirimager/cali</calipath> <– Contains the configuration file (.XML)
<fov>33</fov> <– Field of View
<temperature> <– Temperature range the camera is supposed to locate
  <min>-20</min>

   <max>100</max>

  </temperature>

  <optics_text></optics_text>

  <framerate>32.0</framerate> <– Framerate must be less or equal to the Camera framerate

  <outputmode>2</outputmode> <– 1=Energy, 2=Temperature

  <bispectral>0</bispectral> <– 0=only thermal sensor, 1=bispectral technology (only PI200/PI230)

  <autoflag>

   <enable>1</enable>

   <mininterval>15.0</mininterval>

   <maxinterval>0.0</maxinterval>

  </autoflag>

  <tchipmode>0</tchipmode>  <– 0=Floating (default), 1=Auto, 2=Fixed value -->

  <tchipfixedvalue>40.0</tchipfixedvalue> <– Fixed value for tchipmode=2 -->

  <focus>-1</focus>

  <enable_extended_temp_range>0</enable_extended_temp_range> <– 0=Off, 1=On; Caution! Enables invalid extended temp range-->

  <buffer_queue_size>5</buffer_queue_size> <– internal buffer queue size -->

  <enable_high_precision>0</enable_high_precision> <– 0=Off, 1=On; Enables temperatures with more than 1 decimal places. Depends on used camera(IRImager::getTemprangeDecimal()).-->

  <radial_distortion_correction>0</radial_distortion_correction>

  <use_external_probe>0</use_external_probe> <– 0=Off, 1=On; Temperatures values of external probe BR20AR are accessible on PIFs first analog input in °C-->

 </imager>
For PI200/230 devices, the bispectral parameter needs to be activated (set to 1), if the visible channel is desired to be used.
 The directory /usr/share/doc/libirimager contains examples, which one can copy to the preferred development directory, e.g.

 $ cp /usr/share/doc/libirimager/examples/* ~/workspace/mydestination
The example folder contains various applications that can be used as a template for your own application.
 Before compilation, necessary dependencies need to be installed:

 $ sudo apt-get install build-essential cmake
 For the OpenGL examples, ensure to have freeglut installed. Ubuntu users execute the following:

 $ sudo apt-get install freeglut3 freeglut3-dev
Compilation example with opengl:
 The examples rely on an XML configuration file (see subdirectory /usr/share/doc/libirimager/examples/config), describing the attached camera and its optics. The directory containing calibration files can be overwritten by the tag <calipath>, e.g.:

 <calipath>/opt/piimager/cali</calipath>
 Additionally the folder containing the file Formats.def (describing raw camera formats) can be configured with the tag <formatspath>, e.g.:

 <formatspath>/opt/piimager</formatspath>
Data streams can be accessed in MATLAB via a C-style interface, called DirectBinding. Please see the MATLAB application contained in the examples folder.
The Windows SDK is delivered either as delayed-loadable Dynamic Link Library (.dll) and as Static Library (.lib). The user might use his own DirectShow graph to acquire raw data from the optris PI devices or the included classes VideoCapture and IRDeviceDS . Raw data is to be passed to an IRImager instance.
The windows SDK comes as a zip archive. It can be decompressed to any location on the disk, e.g., to a subfolder of the user's development directory. Environment variables might be needed to be set in order to link against the library or to use it at runtime, e.g.:
set PATH=%PATH%;myfolder\sdk
Before installation, a basic test should be performed in order to verify that the PI imager series can be run on the desired system. For some devices passing the nodrop option to the UVC kernel module is mandatory. The need for this can be checked with a standard application like guvcview. If the camera's raw data (a green noisy image) cannot be displayed at a high framerate the nodrop option needs to be activated. On some devices the nodrop option can lead to incomplete frame transmissions. Therefore it should only be activated if it is really needed.
The nodrop option can be passed at system startup by creating the following file:
$ sudo bash -c 'echo "options uvcvideo nodrop=1" > /etc/modprobe.d/uvcvideo.conf'
This makes the option permanent for the UVC driver (after the next reboot).
Temporary activation can be achieved with:
$ sudo rmmod uvcvideo; sudo modprobe uvcvideo nodrop=1
Alternatively, the parameter can be modified via sysfs during runtime:
$ sudo bash -c 'echo -n 1 > /sys/module/uvcvideo/parameters/nodrop'
Accessing video devices may need the user to be in the system's video group. Checking membership can be done with:
$ groups
Add the current user to this group, if video is not listed there:
$ sudo usermod -a -G video <username>
A new login is necessary afterwards.
The driver is dependant of the following packages:
$ sudo apt-get install cmake freeglut3-dev libusb-1.0-0-dev
Do the basic installation as follows:
Download the latest version of the libirimager: DOWNLOAD LINK
Type in the terminal the following: "sudo dpkg -i /home/User/TheFolderItIsSavedIn/libirimager-<VERSION>-<ARCH>.deb" to install the debian package.
Before using the camera, mandatory calibration files need to be installed. Please connect your camera via the USB cable and ensure access to the internet. Then call the following service application:
$ sudo ir_download_calibration
Everything is installed to /usr/share/libirimager/cali.
If you like to specify a user-defined directory for the calibration files, append the following option:
$ ir_download_calibration -t /tmp
The driver makes use of this calibration directory, if it is specified in the xml configuration file (see Generating configuration files).
The serial number of an attached device can be determined programmatically. Call the following service application to obtain the serial number:
$ ir_find_serial
You might want to search for a specific device, if more than one camera is connected:
$ ir_find_serial -d<Your camera's serial>
For an attached device, an xml configuration file can be generated with the command:
$ ir_generate_configuration > <user-defined file> You might consider to combine the service application calls to concatenate a generic command, e.g.,
$ ir_generate_configuration > `ir_find_serial`.xml The generated file contains several parameters that can be adjusted regarding the application's requirements:
<formatspath>/opt/piimager</formatspath> <– The Folder contains the Formats.def file (raw camera formats) <imager xmlns:xsi="http://www.w3.org/2001/XMLSchema-instance" xmlns:xsd="http://www.w3.org/2001/XMLSchema">
<serial>YOURSERIAL</serial> <– Provide serial number, if you attach more than one camera
<videoformatindex>0</videoformatindex> <– Index of the used video format(USB enpoint) – Link to the Video Formats
<calipath>/usr/share/libirimager/cali</calipath> <– Contains the configuration file (.XML)
<fov>33</fov> <– Field of View
<temperature> <– Temperature range the camera is supposed to locate
<min>-20</min>
<max>100</max>
</temperature>
<optics_text></optics_text>
<framerate>32.0</framerate> <– Framerate must be less or equal to the Camera framerate
<outputmode>2</outputmode> <– 1=Energy, 2=Temperature
<bispectral>0</bispectral> <– 0=only thermal sensor, 1=bispectral technology (only PI200/PI230)
<autoflag>
<enable>1</enable>
<mininterval>15.0</mininterval>
<maxinterval>0.0</maxinterval>
</autoflag>
<tchipmode>0</tchipmode> <– 0=Floating (default), 1=Auto, 2=Fixed value -->
<tchipfixedvalue>40.0</tchipfixedvalue> <– Fixed value for tchipmode=2 -->
<focus>-1</focus>
<enable_extended_temp_range>0</enable_extended_temp_range> <– 0=Off, 1=On; Caution! Enables invalid extended temp range-->
<buffer_queue_size>5</buffer_queue_size> <– internal buffer queue size -->
<enable_high_precision>0</enable_high_precision> <– 0=Off, 1=On; Enables temperatures with more than 1 decimal places. Depends on used camera(IRImager::getTemprangeDecimal()).-->
<radial_distortion_correction>0</radial_distortion_correction>
<use_external_probe>0</use_external_probe> <– 0=Off, 1=On; Temperatures values of external probe BR20AR are accessible on PIFs first analog input in °C-->
</imager>
For PI200/230 devices, the bispectral parameter needs to be activated (set to 1), if the visible channel is desired to be used.
The directory /usr/share/doc/libirimager contains examples, which one can copy to the preferred development directory, e.g.
$ cp /usr/share/doc/libirimager/examples/* ~/workspace/mydestination
The example folder contains various applications that can be used as a template for your own application.
Before compilation, necessary dependencies need to be installed:
$ sudo apt-get install build-essential cmake
For the OpenGL examples, ensure to have freeglut installed. Ubuntu users execute the following:
$ sudo apt-get install freeglut3 freeglut3-dev
Compilation example with opengl:
The examples rely on an XML configuration file (see subdirectory /usr/share/doc/libirimager/examples/config), describing the attached camera and its optics. The directory containing calibration files can be overwritten by the tag <calipath>, e.g.:
<calipath>/opt/piimager/cali</calipath>
Additionally the folder containing the file Formats.def (describing raw camera formats) can be configured with the tag <formatspath>, e.g.:
<formatspath>/opt/piimager</formatspath>
Typically, a control loop checks for the availability of data at a high frame rate (method getFrame of IRDeviceUVC). It returns with raw data that needs to be converted to temperature data. This is done within the method process of class IRImager. It uses itself the above-mentioned callback functions/methods to pass temperature data to the user. The following sequence diagram documents this typical usage.
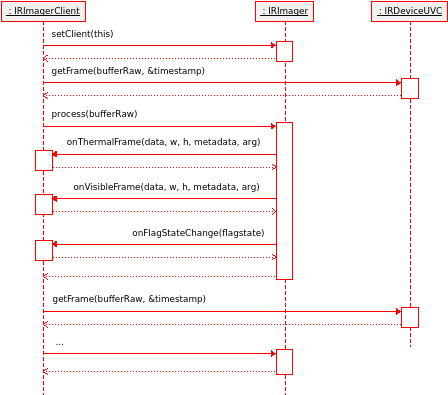
A C-style example is also available. The main difference is the usage of callback functions, instead of callback class methods.
Data streams can be accessed in MATLAB via a C-style interface, called DirectBinding. Please see the MATLAB application contained in the examples folder.
The Windows SDK is delivered either as delayed-loadable Dynamic Link Library (.dll) and as Static Library (.lib). The user might use his own DirectShow graph to acquire raw data from the optris PI devices or the included classes VideoCapture and IRDeviceDS. Raw data is to be passed to an IRImager instance.
 The windows SDK comes as a zip archive. It can be decompressed to any location on the disk, e.g., to a subfolder of the user's development directory. Furthermore it is required to install the Visual C++ Redistributable Packages for Visual Studio 2013, which can be downloaded here (if PIX-Connect is installed, this step can be omitted): https://www.microsoft.com/en-us/download/details.aspx?id=40784 Environment variables might be needed to be set in order to link against the library or to use it at runtime, e.g.:

 set PATH=%PATH%;myfolder\sdk